
Raspberry Pi OS Lite(64bit) をWordpressのサーバとして使用しています。バージョンが上がるたびに、クリーンインストールを行いますが、その時に気が付いた差分を掲載します。
今回は、bookworm(Devian12)からtrixie(Devian13)にメジャーバージョンアップしたとき、特に変わったと思われるところを書いています。
もう一点、少し遅れて、Raspberry Pi Imagermも1.9.6から2.0.0にメジャーバージョンアップしたので合わせて書きます。
2025/10/1のリリースでは、NetworkManagerでネットワーク設定が可能でしたが、2025/12/4のリリースでは、netplanが追加されNetworkManagerの変更内容がリセットされるようになりました。その対処方法も盛り込み済みです。
2026/2/16時点、Raspberry Pi Imagerは、2.0.6にバージョンアップしていますが、操作性に変更がないので更新していません。今後、cloud-initの導入により、Raspberry Pi Imagerから設定できる項目が増えていくと思われ、頻繁にバージョンアップが繰り返されることが予想されます。
bulleseyes(Devian11)からbookworm(Devian12)にメジャーバージンアップしたときの記事は、下記を参照ください。

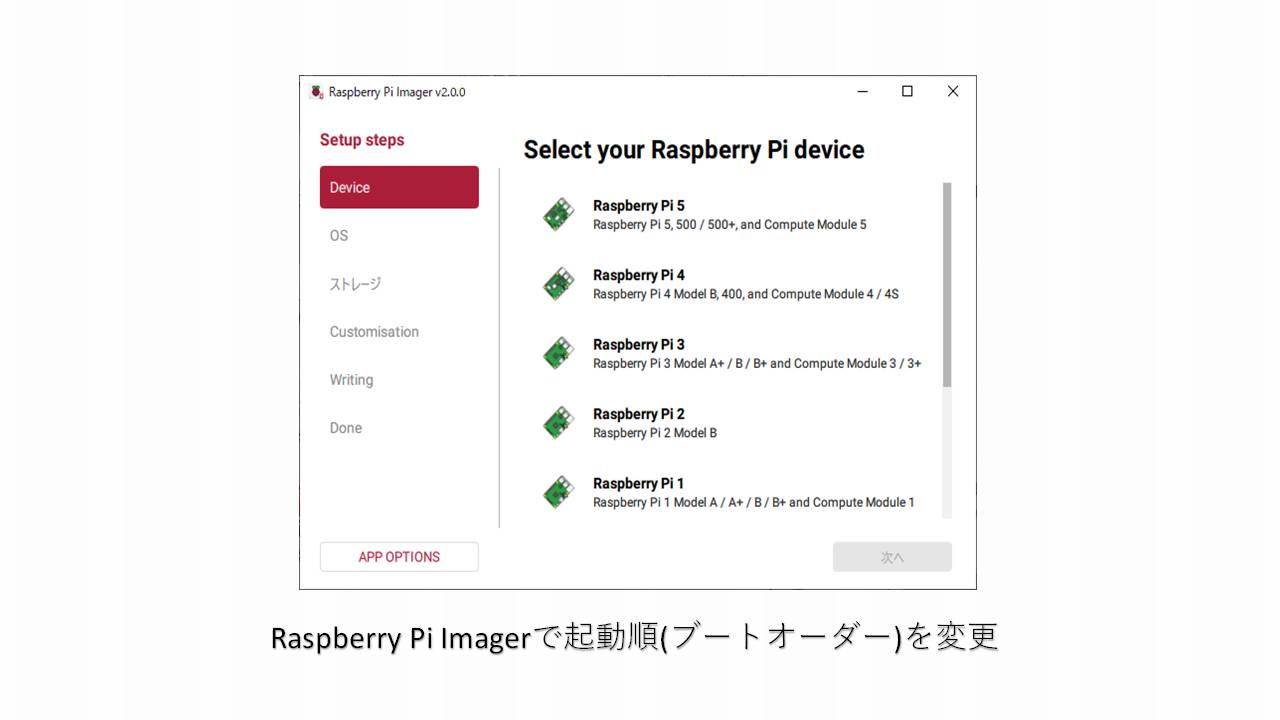
Raspberry Pi Imager2.0.0
2025/10/1 trixie(Debian13)がリリースされた後、少しの間Raspberry Pi Imagerのバージョンは1.9.6だったのですが、直ぐに2.0.0にメジャーバージョンアップされました。
Raspberry Pi Imager2.0.0を使った各種手順について、下記手順を参照ください。
スワップ
swapの管理が、dphys-swapfileからrpi-swap パッケージで管理された、zram(メモリディスク)ベースのswap(圧縮RAMスワップ)に変更となりました。設定は systemd と連携して自動生成されます。
考え方が全く変わり、設定も検討する項目が増えます。記事にまとめているので参照ください。

swapは、メモリが無くなった時に、swapファイルを仮想メモリとして使用し、一時的なメモリの要求に対処します。
Linuxでは、空きメモリは無駄にしない方針で、未使用メモリを積極的にページキャッシュやバッファキャッシュに利用します。もちろん、必要になれば、キャッシュは即座に解放されるため、アプリケーションのメモリ確保を妨げません。
swapが頻繁に使用されるシーンでは、レスポンスの低下やディスク(mircroSDやSSD)の劣化が進みます。そのため、trixieでは、zram(メモリディスク)が標準で組み込まれて、その上にswapが設けられています。
メモリが無くなった時、zram(メモリディスク)に設定したswapファイルを使用しても、所詮メモリ、今後使い方を考えないといけなと思っています。
cloud-init
cloud-initは、元々、Amazon EC2用に開発された、主にOS設定の自動化で開発されたツールです。
trixieでは、Raspberry Pi Imagerで設定された内容を、Raspberry Pi OSの初期起動時に設定するために使用されるようになりました。
cloud-initの設定内容は、下記のファイルにあります。
$ cat /etc/cloud/cloud.cfg.d/99_raspberry-pi.cfg
# configure cloud-init with NoCloud

datasource_list: [ NoCloud, None ]
datasource:
  NoCloud:
    seedfrom: file:///boot/firmware

# Leave SSH key emission to console disabled so that
# users can decide whether to enable it manually.
ssh:
  emit_keys_to_console: false
no_ssh_fingerprints: true

# Disable SSH host key generation
# regenerate_ssh_host_keys.service will take care
# of it on first boot
ssh_deletekeys: false
# Disable generation as it could be that the new keys
# aren't available yet when the service runs.
# also they are really only needed for the ssh service
# which will only run after the keys are already present
# so we don't schedule cloud-init after key generation
# as that would delay first boot too much
ssh_genkeytypes: []
赤字の通り、/boot/firmwareにuser-dataとnetwork-configのファイルがあることが書かれています。
現在の設定されているuser-dataの内容は下記の通りです。Raspberry Pi Imagerで設定した内容です。
$ cat /boot/firmware/user-data
#cloud-config
hostname: raspberrypi
manage_etc_hosts: true
packages:
- avahi-daemon
apt:
  conf: |
    Acquire {
      Check-Date "false";
    };
timezone: Asia/Tokyo
keyboard:
  model: pc105
  layout: "jp"
enable_ssh: true
users:
- name: xxxxxxx
  groups: users,adm,dialout,audio,netdev,video,plugdev,cdrom,games,input,gpio,spi,i2c,render,sudo
  shell: /bin/bash
  lock_passwd: false
  passwd: ---------------------------------------
ssh_pwauth: true
rpi:
  interfaces:
    serial: true
runcmd:
  - [ rfkill, unblock, wifi ]
  - [ sh, -c, "for f in /var/lib/systemd/rfkill/*:wlan; do echo 0 > \"$f\f"; done" ]
※赤字のところは、変更しているのでご注意ください。
network-configの内容は、2025-10-01時点のリリースでは、下記の通りで、Raspberry Pi Imagerでは、Wi-Fiを設定していなかったのでほぼ全てコメントのままでした。
$ cat /boot/firmware/network-config
# This file contains a netplan-compatible configuration which cloud-init will
# apply on first-boot (note: it will *not* update the config after the first
# boot). Please refer to the cloud-init documentation and the netplan reference
# for full details:
#
# https://netplan.io/reference
# https://cloudinit.readthedocs.io/en/latest/topics/network-config.html
# https://cloudinit.readthedocs.io/en/latest/topics/network-config-format-v2.html
#
# Please note that the YAML format employed by this file is sensitive to
# differences in whitespace; if you are editing this file in an editor (like
# Notepad) which uses literal tabs, take care to only use spaces for
# indentation. See the following link for more details:
#
# https://en.wikipedia.org/wiki/YAML
#
# Additionally, please be aware that if your boot sequence depends on active
# networking (e.g. if your cloud-init configuration pulls packages or SSH
# keys from the network), you *must* mark at least one interface as required
# ("optional: false") below. Otherwise, particularly on faster boards,
# cloud-init will start attempting to use the network before it is ready

# Some additional examples are commented out below

#network:
#  version: 2
#
#  ethernets:
#    eth0:
#      dhcp4: true
#      optional: true

#  wifis:
#    wlan0:
#      dhcp4: true
#      optional: true
#      access-points:
#        myhomewifi:
#          password: "S3kr1t"
#        myworkwifi:
#          password: "correct battery horse staple"
#        workssid:
#          auth:
#            key-management: eap
#            method: peap
#            identity: "me@example.com"
#            password: "passw0rd"
#            ca-certificate: /etc/my_ca.pem

#      regulatory-domain: GB
しかし、2025-12-04のリリースでは、下記の通りと積極的にRaspberry Pi Imagerで設定した内容が反映されるようになりました。
※※内容は後日掲載の予定※※
cloud-unitの扱い
初期起動にcloud-initが使用されますが、その後のネットワークは、NetworkManagerのコマンドで設定を進めたいのcloud-init関係のサービスを停止しました。

しかし、2025-12-04のtrixieをインストールしたところ、下記の通りnetplanがNetworkManagerを設定するようになりました。つまり、起動のたびに、下記の通り生成されたファイルでNetworkManagerがリセットされるようになりました。
/boot/firmware/network-config   ← いちばん上位(cloud-init)
        ↓ ①cloud-initが生成
/etc/netplan/*.yaml             ← Netplan(永続設定を生成)
        ↓ ②netplan generate/applyが生成
/run/NetworkManager/system-connections/netplan-*.nmconnection
← NetworkManager が読むランタイム用上記の通り、起動時に①のcloud-initがnetplan向けのファイルを作成します。次の②でnetplanがNetworkManager向けのファイルを作成します。
cloud-initのサービスは、停止・非活性としたので、①のファイルは再生成されないのですが、初回起動時のファイルが残ったままになっています。いろいろ工夫したのですがnetplanの停止がうまくいかず、結局各フォルダのファイルを削除することで回避しました。
$ sudo rm /etc/netplan/*
$ sudo rm /run/NetworkManager/system-connections/*
これで、NetworkManagerで設定した内容が、再起動でリセットされなくなりました。ふーーーーーややこしい